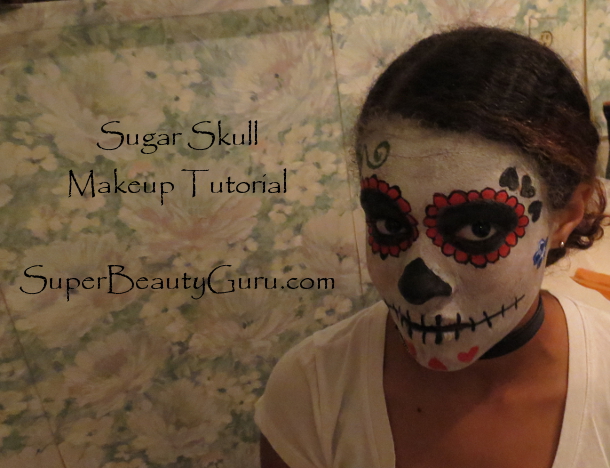
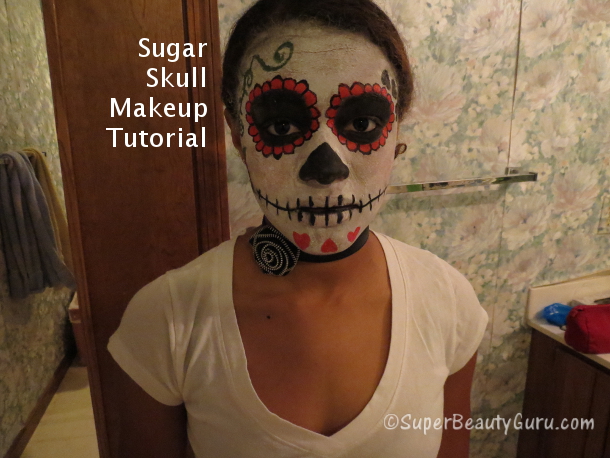
Hey everyone! Today I’m going to show you how to create a sugar skull makeup look.
This makeup is perfect for Halloween, and is a really good costume because if you don’t want to have to buy a costume, you can just paint your face to make you look like a sugar skull, then you’re done!
Here are all the Steps and Products I used:
If you cannot view the above video, click here for the tutorial on this look: Sugar Skull Day of the dead (Dia De Los Muertos) Makeup Tutorial
Subscribe to my Fashion and Beauty YouTube Channel!
Steps
1) Watch the video to see
Makeup Products Used
Eyes
-Face Paint from Walmart – Black
-L’Oreal Eyeshadow – Black
Face
-Face Paint from Walmart – White, Black, Red, Blue, Green
-E.L.F. HD Face Powder – Translucent
-Blush (optional)
-Bronzer (optional)
Subscribe by email if you like my style
Subscribe with: Feed Reader | Bloglovin’
Makeup Gallery
This sugar skull makeup look could be cute, creepy, or even scary depending on how you execute the design. You can add or change as many things as you want to make the look more unique. If you want to make it more realistic, you can always google “Day of the Dead sugar skulls” or something like that to find tons of pictures of actual sugar skulls for dia de los muertos. You can use that for inspiration when creating your design.
If you want to see more pictures of this look, go to page two to view them!
Related Posts:
–Skeleton Costume Makeup Tutorial
Video Transcribed:
Day of the Dead, or Día de los Muertos, is a Mexican holiday that focuses on getting together and remembering family and friends who have died. It’s on November 1st, and to celebrate, people build altars honoring the deceased using sugar skulls, marigolds, and food. Decorating these sugar skulls is a big part of the clebration, so I’m going to decorate Candice’s face in a way people would decorate sugar skulls.
You’re going to need some white face paint and makeup sponges. Squeeze out some of the facepaint, and pick it up on the sponge. Then start placing the paint all over your face. You want the white to be in a thin layer, spread evenly all over your face, so use a combination of patting and swiping motions.
Avoid the eye area, because we will be painting this later. So here I am going in with a second layer of paint. The first layer was just a base, so just add another thin layer on top. If you have light skin already, you might be able to get away with using a light foundation, or only one laye of paint. If you’re super white, then you can skip this white paint step all together!
Now set your face with powder. I used this translucent powder from E.L.F. because it starts out looking white, and my other powders have a skin toned tint. Put this on a powder brush, and pat this all over your face. Try to do this after the paint has dried, or you will get a whole bunch of gunk in your brush.
Now it’s time to use black paint. These are from Walmart by the way. Get some on your synthetic brush and paint this all over your eyes, and up to your eyebrows. This is the sunken in area that a skull would have once a person’s eyes are gone! Gross right? Anyways, bring the black underneith the eyes just a bit, and make a rounded shape. Do this to both eyes, and after it’s fairly dry, use a black eyeshadow to set the paint. I used my super duper fluffy brush to do this quickly. Setting the paint prevents it from smudging and moving, which always happens, especially around the eye area.
Now use a black eyeliner to line your waterline and make sure everything is black. Now take out some colorful paint like red, blue, and green to make designs. Day of the Dead is a happy holiday where you remember the good times you had with people, so they use colors to brighten it up.
Choose a color and make circular/ovalish shapes around the eye area. These shapes remind me of flower petals. I used a tiny synthetic detail brush that gave me great precision in making the shapes. This step takes a long time, so be patient.
Next use yet another synthetic brush and some black paint to make the nose shape. Make a triangle on top of your nose, and try to keep the lines straight and clean.
Now take a black liquid liner and use it to outline the flower petal shaped designs around the eyes. I did this to emphasize the shapes and accentuate the curves of the petals.
Use your black eyeliner in stick form to trace out your smile. I used this first to make sure I knew exactly where I wanted the smile to go before I traced over it with liquid liner, which is harder to fix if you mess up. Add some to the area where your lips meet, and extend this shape out.
Now add shorter, perpendicular lines across the smile. These are your teeth. Once you are happy with your design, trace over it with your black liquid liner to darken everything and make it smudge proof.
I decided to add a bit of color by dusting on a light pink blush to her cheeks. You don’t need to do this, but I wanted to.
The next step is contouring, so use your lightest bronzer and place it in the hollows of your cheeks to slenderize and make it look like your face is more sucked in. Skulls naturally have this sucked-in look because they have no skin…
Here I’m painting a flower, and I don’t know why I didn’t show the camera. Oops!
On this side I made a rose. I mixed my red and white paints to make pink, and painted on a blob shape. Once that was dry, I used liquid liner to define the petals by makeing C shapes, starting from the center, and working my way to the outside of the rose.
To make the leaves, I used the green paint and put a few triangle-ish shapes around the flower. On the side of her forehead I added a few black hearts. Above the rose, I used the green to make a vine with thorns.
On her chin, I added a few red hearts, some upside down and some right side up. Making these designs is a lot easier if you have small brushes.
And that was the last step. Feel free to add any other designs if you want. This is what a finished sugar skull looks like, It’s a creepy, yet colorful design which explains why Candice scared quite a few people when she wore it to school. Every single person at school complemented her on this, and it’s a good thing too cuz I did not wake up super early for nothing!
If you do this look, I’m sure everyone would love it, including me, so send me picture on twitter if you do try this out! Thanks so much for watching, and I’ll see you in my next video, bye!
Thanks for stopping by! Please subscribe to my blog if you like it! xoxo Amber C Johnson from Super Beauty Guru <3
Pages: 1 2


Came across your blog while searching for the beauty guru 11 questions tag! Love your blog
XO CHAMAFASHION
thank you so much
Pingback: Skeleton Makeup Tutorial Halloween Costume | Super Beauty Guru